📋 Migrate from Classic to YAML Pipelines in Azure DevOps
In my previous blog, I explained why you should migrate from Classic Pipelines to YAML. This blog dives deeper into the steps for a smooth migration.
Why switch to YAML?
Migrating from Classic Pipelines to YAML is more than just rewriting in YAML. YAML pipelines work fundamentally differently and may seem complex at first. However, this approach offers key benefits:
- Pipelines as code: Better version control and collaboration.
- Reusability: Less duplicate code with YAML templates.
- Improved reviews: Integration with pull requests for better control.
How to migrate to YAML?
It depends on whether you’re just starting or if you’re down to the last remaining pipelines. If you’re starting fresh, follow the steps below. If you already have YAML pipelines, you can skip some steps.
Step 1: 🚀 Create new pipelines in YAML
Avoid future migration work by setting up new pipelines directly in YAML. Microsoft’s documentation provides sufficient guidance on YAML pipelines.
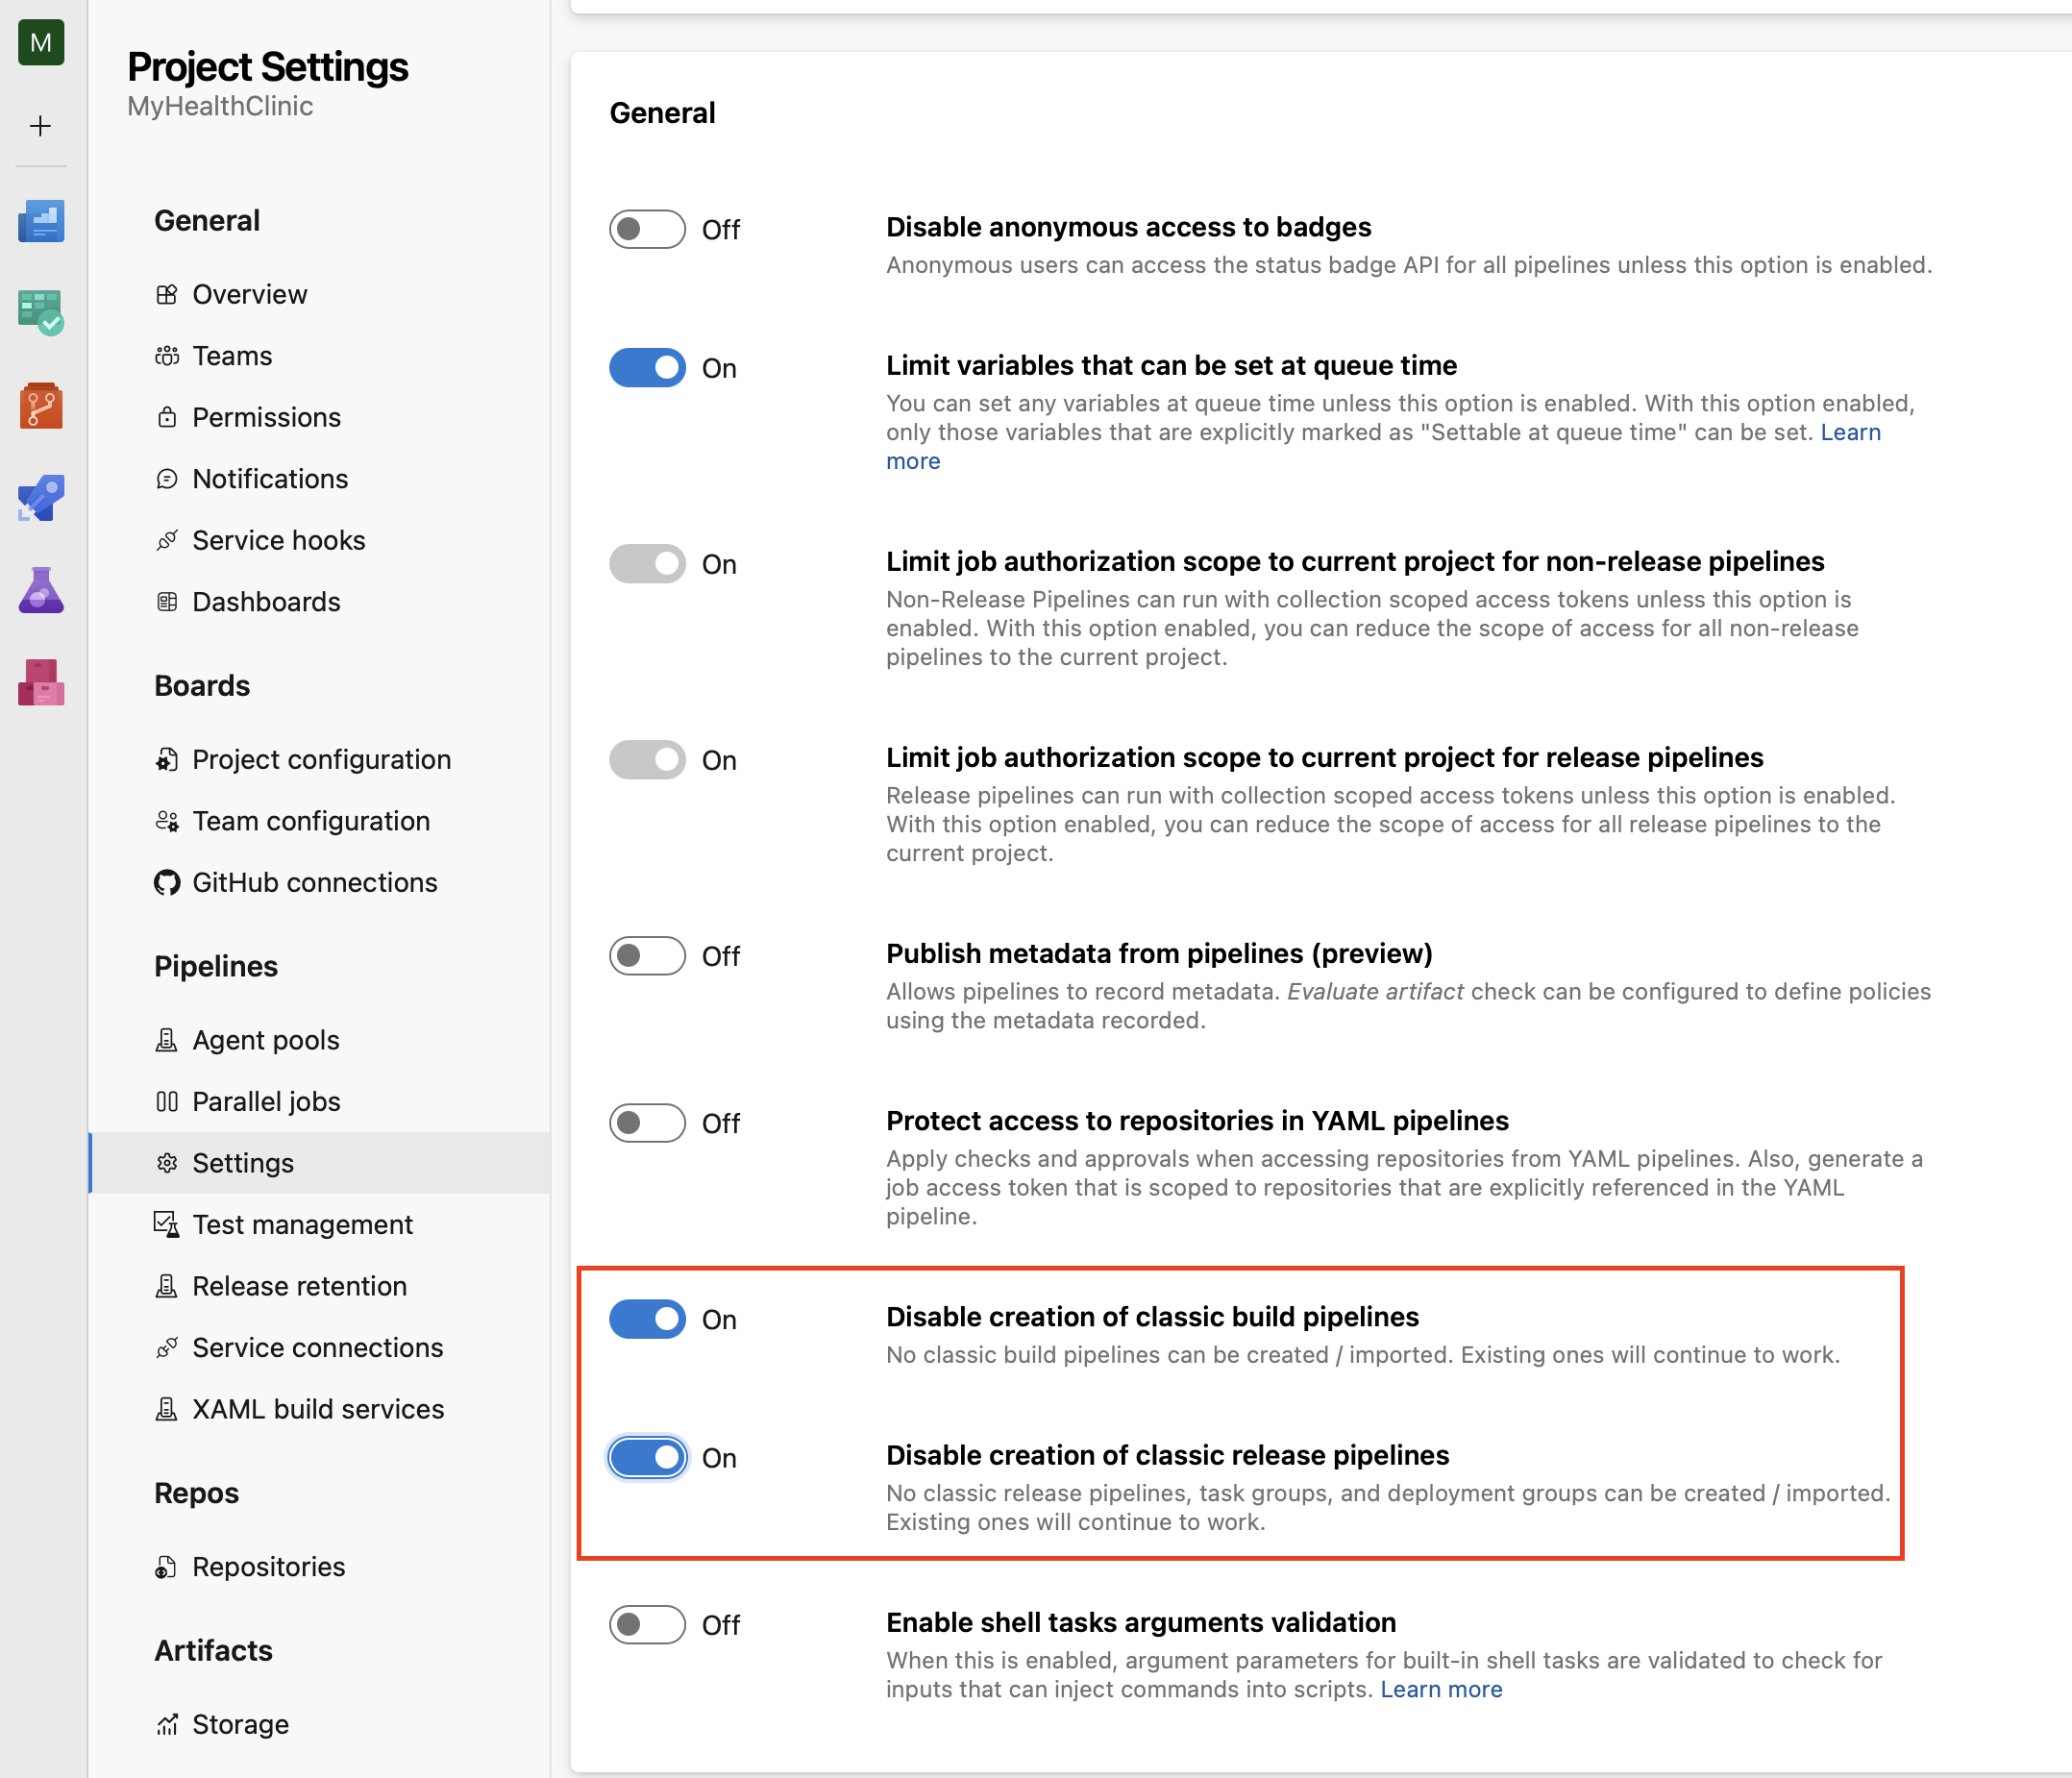
Step 2: ⚙️ Prevent new Classic Pipelines
Disable the creation of Classic Pipelines to ensure teams don’t accidentally continue using outdated methods. You can do this via: Project Settings > Pipelines > Settings > Disable creation of classic pipelines
Step 3: 🗺️ Map out your existing pipelines
- How many Classic Pipelines exist?
- What do they do?
- Are they Build or Release pipelines?
- What dependencies do they have (Service Connections, approvals, variables)?
- Are Task Groups or other reusable components used?
This helps plan the migration and prevents surprises.
Step 4: 🍳 Start simple
Begin with a small, simple pipeline. For Build pipelines, you can export YAML via: More actions > Export as YAML
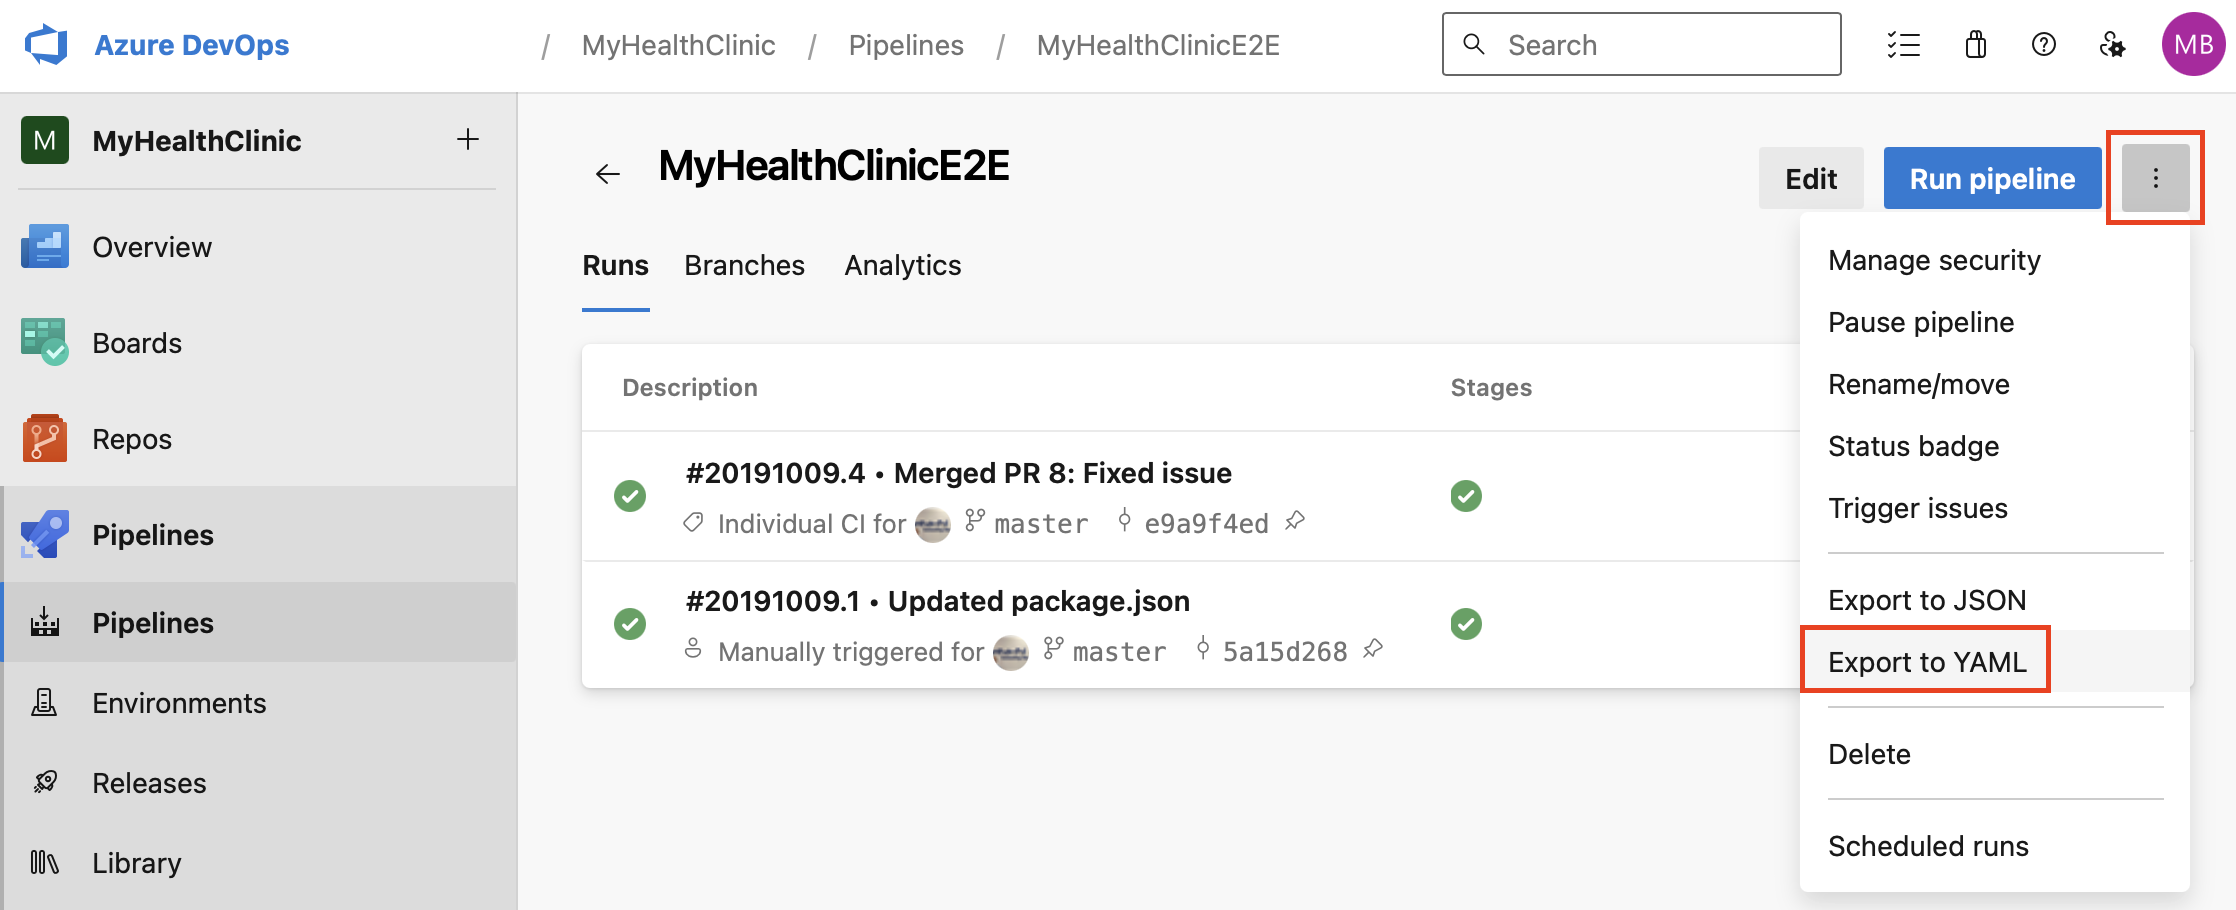
This provides a good starting point, but keep in mind that exports are not always complete and often require manual adjustments.
Release pipelines require more manual effort since there’s no direct YAML export option. Start with simple deployments and expand step by step.
1
2
3
4
5
6
7
8
jobs:
- job: Job_1
  displayName: Agent job 1
  pool:
    vmImage: windows-latest
  steps:
  - checkout: self
  - task: ...
Step 5: ♻️ Reuse with YAML templates
If you have repetitive tasks, convert them into templates to avoid duplicate code and simplify maintenance. YAML supports templates for stages, jobs, steps, variables, or even entire pipelines.
1
2
3
4
5
6
7
8
9
stages:
  - stage: Build
    jobs:
      - template: templates/build.yml
  - stage: Deploy
    jobs:
      - template: templates/deploy.yml
        parameters:
          environment: dev
Templates can be included to incorporate specific sections in your pipeline, or you can extend from a template. The latter determines the pipeline structure, allowing customization through parameters. This approach enables the creation of more secure pipelines.
Step 6: 🧱 Create multistage pipelines
Classic Pipelines separate build and release, but with YAML, you can manage everything in a single pipeline. Use stages, deployment jobs, and environments for more flexibility, reducing overhead.
Stages in Classic vs. YAML
In Classic Release Pipelines, you configure approvals and gates per stage using the UI. In YAML, things work differently.
YAML pipelines introduce new components: environments and deployment jobs. Deployment jobs are similar to jobs, as they consist of multiple tasks. However, a deployment job always runs in an environment, allowing you to define different deployment strategies.
1
2
3
4
5
6
7
8
9
10
11
12
13
14
15
16
17
18
19
20
21
22
23
stages:
- stage: DeployToProduction
  jobs:
  - deployment: Deploy
    environment: Production
    strategy:
      runOnce:
        preDeploy:
          steps:
          - script: |
              echo "Create backup"
              ...
        deploy:
          steps:
          - script: |
              echo "Deploying to Production"
              ./runDeployment.sh ...
        on:
          failure:
            steps:
            - script: |
              echo "Restore backup"
              ...
At first, this may seem complex, but it has significant benefits. Environments are reusable. You only need to configure who can approve deployments once, and this prevents releases without approval. This also works well when combined with template extensions.
Step 7: 🏎️ Speed up migration with Yamlizr
Yamlizr is a useful CLI tool for converting Classic Pipelines to YAML. It generates YAML based on the tasks and settings used.
It’s not a one-click migration tool, but it can significantly speed up your transition. Yamlizr automatically generates YAML code for all your pipelines, which you can easily use to quickly assemble your YAML pipelines. You’ll have to figure out much less on your own and get a great kick-start for converting parts of your pipeline quickly.
How does it work?
Check out the Yamlizr GitHub page for details, but in short:
- Install Yamlizr.
Create a PAT, select a project, and run:
yamlizr generate -pat <your PAT here> -org <your AzDO Organisation Uri> -proj <your AzDO project name> -out <Your output location>- Review and adjust the generated YAML as needed.
Although Yamlizr automates a lot of the work, it’s important to thoroughly review the generated YAML. Specific settings or custom tasks may require manual adjustments.
Note on Release Pipelines:
Yamlizr converts everything into jobs by default. If you have approvals in your current release flow, you must manually convert them to deployment jobs and configure environments.
Step 8: 🧪 Validate and test
Run YAML pipelines in parallel with Classic Pipelines, then compare logs and outputs. This ensures a safe migration without risks.
Seeing unexpected results? Check your pipeline thoroughly. Conditions or expressions may behave differently than expected.
Step 9: 🧹 Migrate and clean up
Once the YAML pipeline is stable, remove the Classic Pipeline or move it to a restricted folder. This prevents accidental reuse.
Also, update documentation so your team understands the new YAML workflow.
Final tips
- Test YAML with Validate YAML.
- Use the “task assistant“ to explore task input fields.
- Utilize variables and variable groups for reusability.
- Use parameters to control pipeline input values.
Need help with your migration? Feel free to reach out! 🚀